Not every roof accepts solar panels the same way. The material, pitch, shape, and structural condition of your roof all directly affect how panels are mounted, how many can fit, and what the installation process involves. This guide walks through each major roof type found in Australian homes explaining the mounting method, the key installation considerations, and what to watch out for so you know exactly what to expect before your installer arrives.
Table of Contents
Your roof type doesn't determine whether you can go solar, it determines how the installation is approached. Nearly every residential roof in Australia is compatible with solar panels. What changes is the mounting hardware, the skill level required, and the preparation needed beforehand. Understanding this upfront saves surprises on installation day.
Can Solar Panels Be Installed on Any Roof Type?
Yes. Solar panels can be installed on Colorbond, concrete tile, terracotta tile, flat membrane, slate, and hip roofs. The mounting method differs for each material, but a qualified CEC-accredited installer can work with virtually any residential rooftop in Australia.
The only roofs that genuinely limit installation are those with structural deficiencies, rotted framing, insufficient load capacity, or serious pre-existing damage. These require repair before any solar work begins, not after.
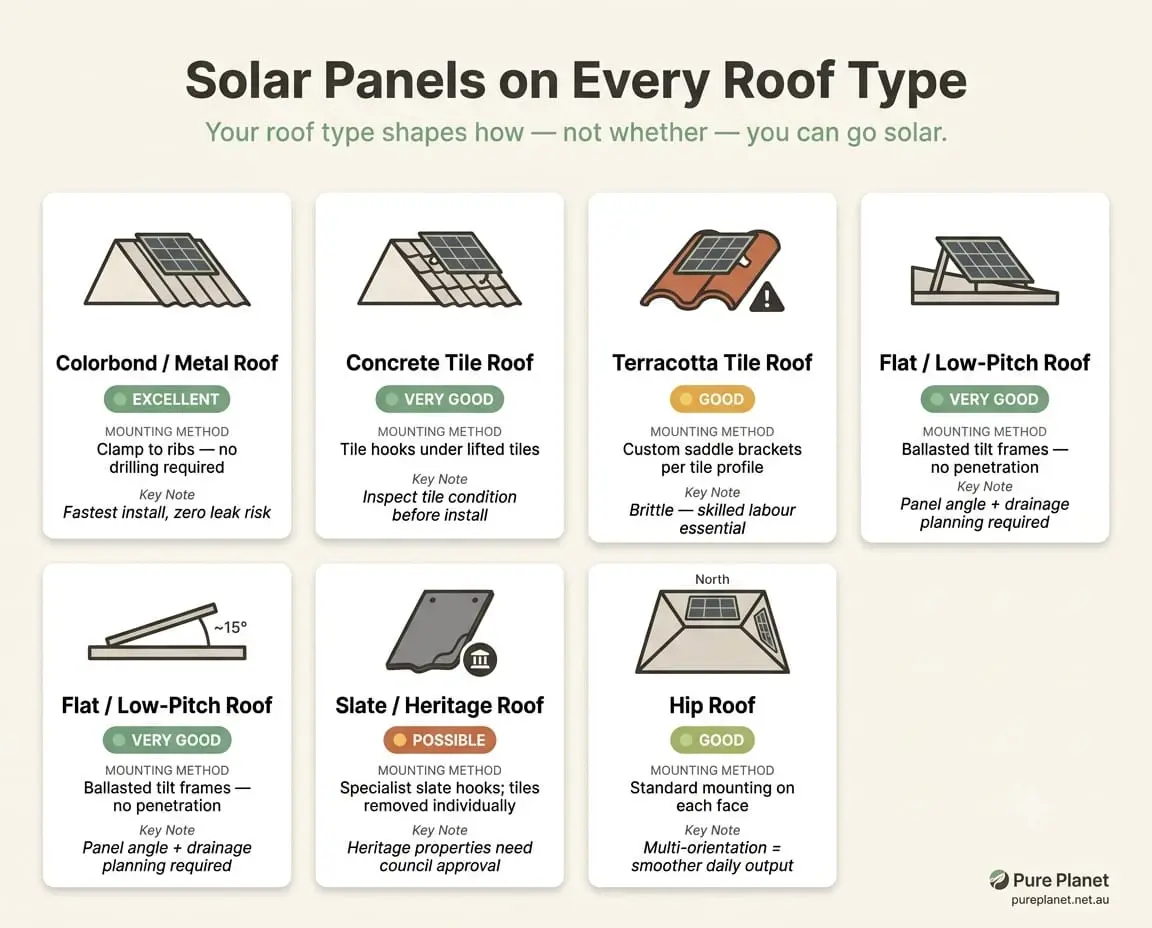
Roof Type Comparison at a Glance
Not sure which system size suits your home? Read our guide on choosing the right solar panel system for your roof before your installer visit.
Colorbond and Metal Roofs
Colorbond and metal roofs are the easiest roof type for solar installation. Clamps grip the raised ribs or standing seams directly, no drilling, no waterproofing risk, and no penetrations.
Colorbond is the most installer-friendly roofing material in Australia. The lightweight mounting hardware adds minimal structural load, installation is typically completed in a single day, and the no-penetration approach means zero risk of creating leak points. All-black panel profiles sit cleanly against dark Colorbond for a modern, integrated appearance.
Tile Roofs: Concrete and Terracotta
Tile roofs are installed using tile hooks L-shaped brackets fixed to the rafters beneath the surface, with individual tiles lifted, the hook inserted underneath, and the tile replaced on top. No tiles are drilled through or permanently removed.
Concrete tiles are uniform in profile and accept standard hooks without modification. The main concern is age tiles older than 20–25 years can be brittle, so a pre-installation inspection identifies any that need replacing before work begins.
Terracotta tiles require more care. They're more fragile than concrete and many older profiles need custom saddle brackets rather than standard hooks. Key things to confirm before installation:
Existing tile condition (any cracks should be repaired first)
Availability of spare matching tiles for any accidental breakage
Moss or lichen on older roofs (treat before install to maintain airflow beneath panels)
Flat and Low-Pitch Roofs
Flat roofs and low-pitch roofs work well for solar, but panels must be angled using tilt frames typically set at 10°–15°, to face the sun and allow water to drain off cleanly.
Two approaches are used:
Ballasted tilt frames — weighted bases hold frames without penetrating the membrane. Best for torch-on or membrane roofs where drilling would create waterproofing risk. Requires a structural check to confirm the roof can handle the added weight.
Penetrating anchors — drilled through the membrane and sealed with specialist waterproofing. Used where ballast weight exceeds the roof's load rating.
Row spacing between panel arrays must be calculated carefully; panels placed too close together create self-shading, reducing output significantly.
Slate and Heritage Roofs
Slate roofs can support solar panels, but only with specialist installation. Individual slates are carefully removed, a purpose-built hook is fixed to the rafter beneath, and the original slate is refitted over the top without cracking it.
Slate is fragile and often irreplaceable on older homes, so only installers with direct slate roofing experience should carry out this work.
Heritage-listed properties require council planning approval before any exterior work, including solar. Requirements vary by municipality but typically include positioning panels out of street view, using low-profile black-frame panels, and submitting a planning permit before installation. Pure Planet manages the entire permit process on behalf of homeowners, which typically adds 4–6 weeks to the timeline.
Hip Roofs and Complex Shapes
Hip roofs where all four sides slope down to the walls are fully compatible with solar. The limitation is the usable area per face, which is smaller than a standard gable roof. The solution is using multiple faces strategically.
North face — highest consistent daily output
East face — captures morning production
West face — captures afternoon production; valuable for households with higher evening demand
This multi-orientation approach produces a smoother generation curve across the day compared to a single-face installation. For complex roofs with skylights, dormers, chimneys, or vents, Enphase microinverters or DC power optimisers prevent shading on one section from dragging down the output of the whole array.
For more detail on shading management in complex layouts, see our guide on how to design a custom solar system for your roof.
What to Check Before Installation
Regardless of roof type, your installer should assess the following before work begins:
Structural condition — rafters, battens, and roof frame must be sound; rot or undersized timber needs repair first
Existing roof surface — cracked tiles, rusted metal, or degraded membrane should be fixed before panels go on
Load capacity — a standard residential array adds approximately 15–20 kg per panel
Electrical compatibility — switchboards with ceramic fuses may require upgrading before the inverter can be connected
Shading — trees, chimneys, antennas, and neighbouring buildings are mapped and shadow paths calculated across seasons
For the full installation process from site audit to grid connection, see our step-by-step solar installation guide.
💡 Pro Tip
Before your installer visits, walk around your home and photograph any visible roof damage cracked tiles, rust patches, moss growth, or sagging areas. Sharing these photos before the site visit means your installer arrives prepared, and avoids installation delays caused by unexpected repairs on the day.
Conclusion
Your roof type determines how solar panels are installed, not whether they can be. Colorbond is the fastest and cleanest. Tiled roofs need careful handling but are fully compatible. Flat roofs use tilt frames. Slate and heritage roofs need specialist knowledge and sometimes council approval. Hip roofs use multi-face layouts to maximise output.
Every successful installation starts with a proper site assessment. Pure Planet conducts a thorough roof, structural, and shading evaluation before any panels are ordered. Request a free site assessment to find out exactly what your installation involves.